Finding a hornet nest near your home can be unsettling. These insects are large, aggressive, and territorial. A single sting can be painful, and multiple stings may lead to severe allergic reactions. That’s why hornet nest removal needs careful planning and the right approach. This guide covers everything from identifying nests to safe removal methods, professional help, prevention strategies, and common questions homeowners often ask.
Understanding Hornets and Their Nests
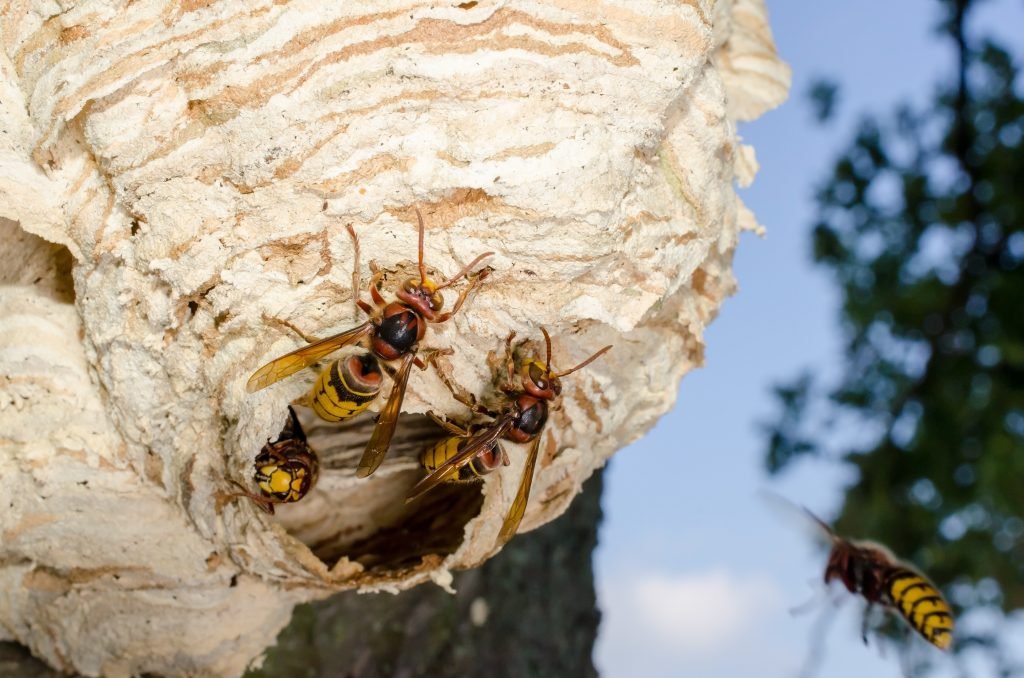
Hornets belong to the wasp family, but they’re larger, stronger, and more aggressive than their smaller cousins. A typical hornet measures about 1–1.5 inches and has a distinctive yellow-and-black or brown-and-orange coloring. Unlike bees, hornets can sting repeatedly without losing their stinger, which makes them particularly dangerous when defending their nest.
Differences Between Hornet and Wasp Nests
| Feature | Hornet Nests | Wasp Nests |
| Material | Gray, papery layers made of chewed wood fibers | Similar but often smaller and less layered |
| Location | Trees, attics, wall voids, sheds, high ledges | Eaves, garages, bushes, porch ceilings |
| Size | Can grow as big as a basketball | Usually smaller, though some wasp nests expand |
| Aggression | Highly territorial, quick to swarm | Aggressive but usually less than hornets |
Hornets often build nests in high or hidden spots, which makes them harder to spot until the colony grows large. By late summer, a nest can house hundreds of hornets, which is when they become a real danger to nearby people and pets.
Why nest removal matters: Leaving a hornet nest untreated increases the chance of attacks, structural damage if built in walls or attics, and higher costs when professional removal becomes necessary.
Signs You Need Hornet Nest Removal
Sometimes you may not see a nest right away, but there are clear warning signs:
- Visible nest structure that looks like gray, layered paper.
- Heavy hornet activity around trees, rooftops, or garden areas.
- Aggressive behavior if you approach too close.
- Buzzing sounds in walls or attic spaces.
Hornets are most active in late summer, when colonies reach their peak size. The longer you delay, the more aggressive and numerous they become. Early removal is always safer.
Safety Concerns Before Attempting Hornet Nest Removal
Hornets aren’t like houseflies you can swat away. They attack in groups and defend their colony fiercely. Before trying any removal method, keep these risks in mind:
- Multiple stings: Hornets can sting repeatedly, injecting venom that causes sharp pain and swelling.
- Allergic reactions: Some people experience anaphylaxis, a severe reaction that can be life-threatening without immediate medical care.
- Unpredictable aggression: Even a small disturbance can trigger a swarm.
- Difficult nest locations: Climbing ladders or reaching into wall cavities increases danger.
Important: If you or someone in your household has a known allergy to stings, never attempt DIY hornet removal. Contact professionals immediately.
DIY Hornet Nest Removal: Methods and Precautions
In some cases, homeowners choose to handle nest removal themselves. While risky, it’s possible if the nest is small, accessible, and you have the proper protective gear.
Best Time of Day to Remove Hornet Nests
Hornets are less active at night or just before dawn. At this time, most of the colony is inside the nest, which increases the effectiveness of sprays or dusts. Avoid daytime removal, as hornets will be fully alert and aggressive.
Tools and Protective Gear You’ll Need
- Thick protective clothing (long sleeves, pants, gloves, boots)
- A bee suit or heavy jacket with a veil for added safety
- Flashlight with red filter (hornets don’t see red light well)
- Insecticide spray labeled for hornets and wasps
- Extension pole or sprayer for distance application
- Ladder (only if absolutely necessary)
Step-by-Step DIY Hornet Nest Removal Process
- Suit up fully in protective clothing.
- Approach quietly at night using a red-filter flashlight.
- Spray the nest entrance thoroughly with insecticide from a safe distance.
- Retreat immediately after spraying to avoid retaliation.
- Wait 24–48 hours before checking activity levels.
- Remove the nest carefully using a pole or long-handled tool once all hornets are dead.
Common DIY Mistakes to Avoid
- Spraying during the day when hornets are active.
- Using water or fire which only angers the colony and creates hazards.
- Wearing inadequate protection that leaves skin exposed.
- Standing too close during spraying.
Case Study: A homeowner in Texas attempted to knock down a basketball-sized nest with a broom during the day. The result was dozens of stings, a trip to the ER, and eventually hiring professionals anyway. This highlights why caution is essential.
Professional Hornet Nest Removal Services
For most people, professional removal is the safest choice. Pest control experts have training, equipment, and chemical treatments that aren’t available in stores.
Why Hire Professionals?
- Reduced risk of injury and allergic reactions
- Faster, more effective elimination
- Ability to reach difficult areas
- Eco-friendly options when possible
What to Expect During Professional Hornet Removal
- Inspection: Technicians locate the nest and assess the size.
- Treatment: Specialized sprays, dusts, or vacuum systems are used.
- Removal: Dead nest material is safely taken away.
- Prevention tips: Sealing entry points and future monitoring.
Hornet Nest Removal Cost Factors
The price of hiring a professional depends on several variables:
| Factor | Impact on Cost |
| Nest size | Larger nests require more time and product |
| Location | Hard-to-reach areas (attics, tall trees) increase cost |
| Region | Prices vary by city and state |
| Service guarantee | Some companies include follow-up visits |
On average, hornet removal costs between $100 and $350. For larger infestations or multiple nests, the price may climb higher.
Preventing Hornets from Building Nests Again
Once a nest is gone, prevention is key. Hornets often return to the same area if conditions remain favorable.
Prevention Tips
- Seal entry points: Patch cracks in walls, vents, and roofing.
- Reduce food sources: Keep trash sealed, remove fallen fruit, and store pet food indoors.
- Maintain landscaping: Trim overhanging branches, clear dense shrubs.
- Outdoor lighting: Replace bright white lights with yellow bulbs, which attract fewer insects.
- Regular inspections: Check attics, sheds, and trees in early spring.
By making your property less attractive, you minimize the chances of another nest forming.
FAQs About Hornet Nest Removal
Can hornets return to an old nest?
No, hornets abandon nests in winter. However, new queens may build a fresh nest nearby the following spring.
Are sprays safe for pets and children?
Most sprays are toxic if touched or inhaled when wet. Keep kids and pets indoors during treatment, and only return once the area is dry.
How long does it take to eliminate a nest?
DIY treatments may take 24–48 hours. Professionals often neutralize nests in a single visit.
What’s the difference between hornet and wasp removal?
Hornet nests are larger, more aggressive, and often harder to access. Wasp nests are usually smaller and less risky to remove.
Final Thoughts on Hornet Nest Removal
Removing a hornet nest isn’t just a matter of convenience; it’s about safety. These insects defend their colonies with surprising aggression, and the risks of multiple stings are real. While DIY removal can work in certain situations, it’s often better to hire professionals for peace of mind and effectiveness.
Once the nest is gone, prevention becomes your best strategy. Keep your home sealed, food sources under control, and outdoor areas maintained. That way you’ll avoid another infestation and the dangers that come with it.
Remember, your safety comes first. If the nest is large or in a tricky spot, don’t risk it. Call an expert and let them handle the job.


Leave a Reply